Sunday, March 11, 2012

Spinach and Basil Pesto with Lemon


St. Patrick's Day is less than a week away so I decided I would share a few recipes inspired by the holiday.  While pesto doesn't tend to come to mind when you think of traditional St. Patrick's Day fare, the color is definitely on point!  Also, with spring right around the corner, this is a great recipe that pairs well with seafood and chicken as well as pasta.

I'm always looking for easy weeknight meals and pesto comes together really quickly so it is a great option for those nights you need something fast.  It also freezes well so you can always double the recipe and put any unused portion in a zip-top bag and freeze for another meal.

Since I was serving this with pasta and shrimp, I decided to add lemon zest to the mix.  That's one of the great things about pesto - You can add in anything from cilantro to sundried tomatoes.  I also added spinach to increase the nutritional value - Any way to fit in a veggie!  This recipe is super simple because you toss everything in a food processor and let it whirl (I made mine in a food processor but you can easily make it in a blender).


Spinach and Basil Pesto with Lemon
Serves: 4

3 handfuls of fresh spinach
2 handfuls of basil
1-2 cloves garlic
1/2 cup toasted pine nuts
1/2 cup grated parmesan cheese
Zest and juice from 1/2 a lemon
1/4-1/3 cup olive oil
Salt & pepper

Add everything but the olive oil into a food processor.  Cover and begin blending while streaming in the olive oil.  I like my pesto a bit on the thicker side if I'm serving it with pasta.  I'll use the pasta water to thin it out some.  If I am serving this over chicken, I'll add a bit more olive oil so it's slightly thinner.

Thursday, March 1, 2012

Homemade Thin Mints


Happy March!  I don't know about you, but I think the year is flying by very quickly.  I did manage to make it through the first couple of months without buying any Girl Scout cookies (or eating any, for that matter).  But, I felt a bit left out, so I decided I would make some cookies from scratch.

Thin mints are one of my favorite Girl Scout cookies and when I stumbled upon this recipe, I decided I needed to make them...  And soon!  I suppose I could just buy a dozen boxes box to benefit the Girl Scouts, but what fun is that?  Besides, this way, I can control the quality of the ingredients and I can feel better about eating them all in one sitting.

These were not the easiest cookies to make.  While the technique is very basic, it's a bit time consuming when it comes time to dipping the cookies in chocolate.  It also gets a tad messy, but again, that's part of the fun!  Because of the time these took to roll out and coat in chocolate, I will make these again, but only for a special occasion.

While the cookie isn't an exact replica of what you would buy from your friend in a green beret.  Wait.  Do Girl Scouts wear green berets?  Or am I confusing them with the army???  Whichever, these cookies have a very similar texture and taste to the original.  I suggest keeping these in the refrigerator or freezer as they don't contain any stabilizers to keep the chocolate from melting.  The only thing I would change is adding more peppermint to the chocolate coating and maybe a dash to the dough.  Otherwise, I wouldn't change a thing.

Oh, and the only reason I made these heart shaped is that I didn't have a small enough circle cookie cutter and this was the closest I could find to the size listed in the recipe.  For a the full recipe visit Handle the Heat.

Go forth and prosper.  Or serve God and your country.  Whatever it is Girl Scouts swear to do - Is it obvious I wasn't a Girl Scout?

Monday, February 27, 2012

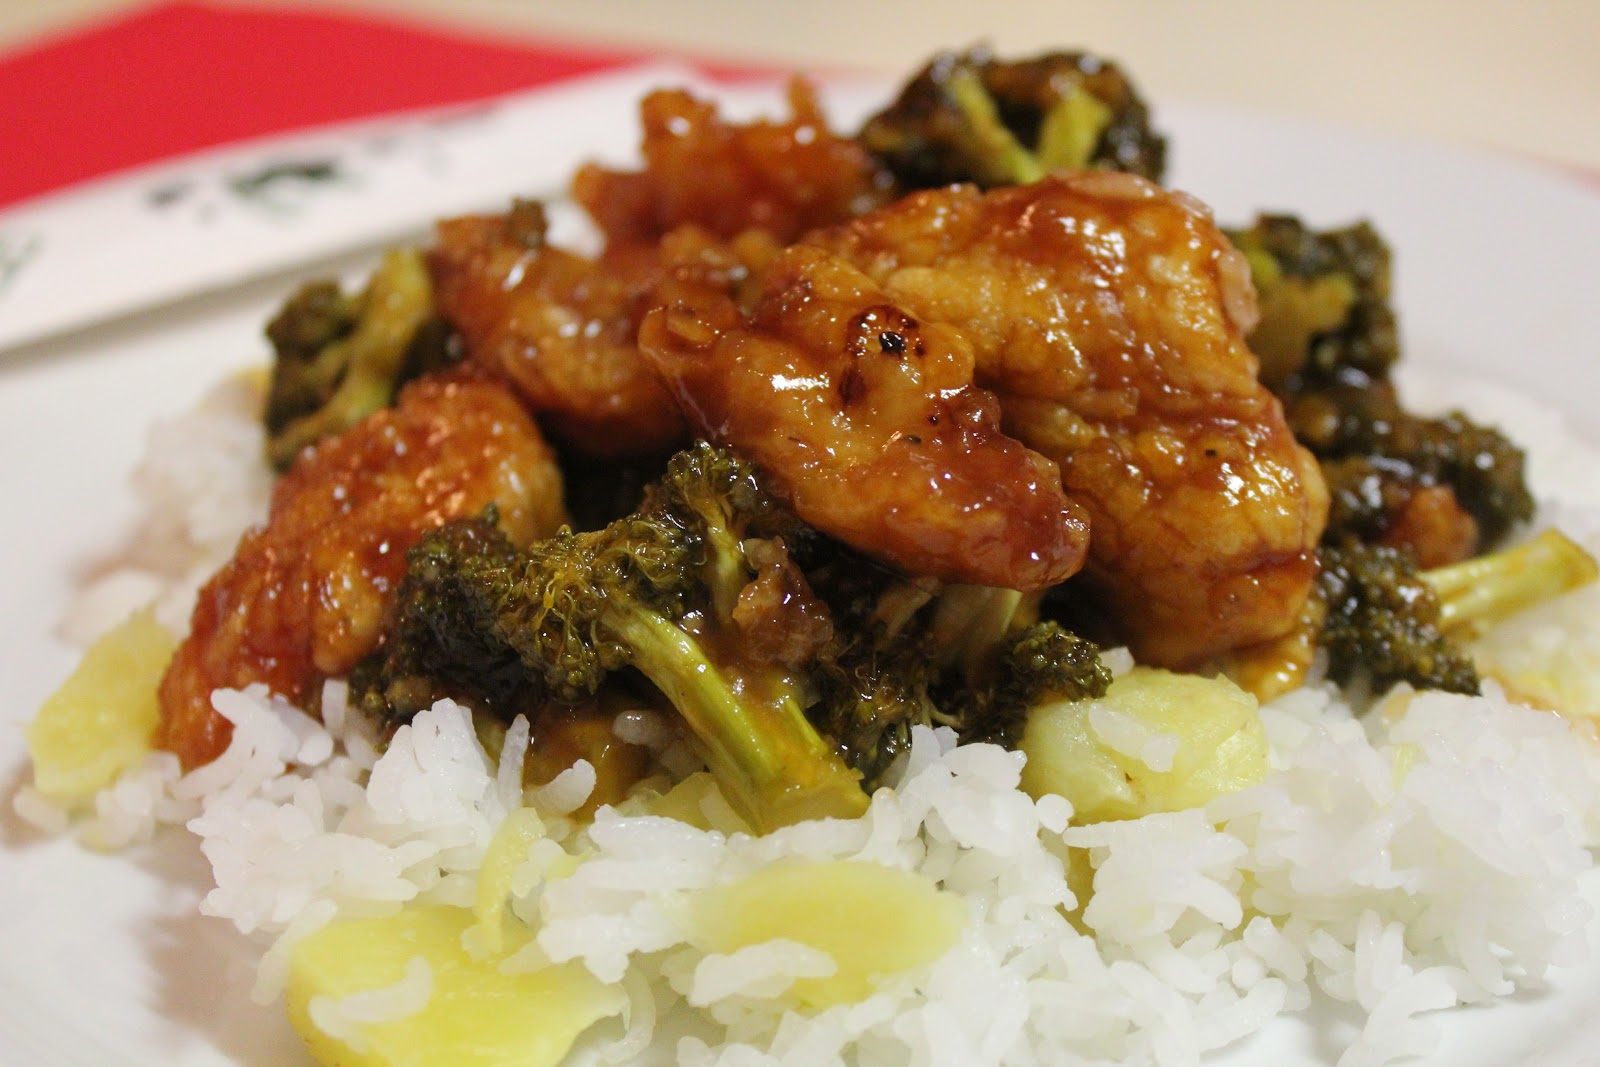
Better Than Takeout Sweet and Sour Chicken


The other night I was craving Chinese but I was not craving the icky, bloated feeling I tend to get after eating Chinese takeout.  I don't know if it's because I can't decide on one dish and order a few then eat too much, or what but I never feel good about my decision to order takeout.

I scanned the internet looking for a new Chinese recipe.  I have great recipes for Ginger Beef Stir Fry and General Tso's Chicken but I was looking for something new.  I came across quite a few recipes that I wanted to try but the decision was made based on what I had in my refrigerator!  I really wanted to make orange chicken but I was out of oranges.  I have to be sure to stock up on some so I can try that recipe soon!  I decided on the sweet and sour chicken because I had all of the ingredients on hand (actually, all are staples in my pantry/fridge!) and it looked like it would hit the spot.

I did make a few changes to the original recipe.  Instead of whole eggs, I used just egg whites and I used one pound of chicken tenders instead of breasts.  I also added some broccoli which eliminated the need to cook a vegetable!  Winning!

The flavor of this chicken is nice - Not overly sweet or sour.  The coating from the cornstarch held up nicely while the chicken cooked with the sauce.  I served this over Jasmine rice which I mixed with some diced fresh pineapple.  This is a great alternative to takeout Chinese food and I think this would be a great option for a dinner party!

Recipe is adapted from How Sweet It Is via Kitchen Cafe.
Serves: 3-4

Chicken
1 pound chicken tenders
2 egg whites
1 cup cornstarch
salt & pepper
1/4 cup canola oil
nonstick spray
2-3 small broccoli crowns, cut into pieces

Sauce*
3/4 cup sugar
4 T ketchup
1/2 apple cider vinegar
1 T soy sauce
1T garlic


Preheat oven to 325 and spray a 13x9 baking dish with nonstick spray.  Prepare sauce by combining sugar through garlic.  Set aside.

Cut chicken into bite sized pieces.  Season with salt and pepper.  Pour oil in a skillet large enough to fit the chicken and preheat.  If the skillet isn't large enough, you'll have to cook in batches as you don't want to overcrowd the pan.  The skillet is ready when the oil ripples.  You can also test the oil by putting a little bit of cornstarch in the oil.  If it bubbles right away, the oil is ready.

Set up two shallow dishes - One for the egg whites and the other for the cornstarch.  Beat the egg whites until combined.  In batches, add the chicken to the egg then to the cornstarch to coat.  Once the chicken is coated, add to the skillet and brown.  Once the chicken is brown on one side, flip over and cook another couple of minutes, just until the chicken is almost done.  Place chicken in the baking dish and cover with sauce.  Cook for an hour, stirring every 15 minutes.  Add the broccoli in for the last 20-30 minutes, depending on how much you like your broccoli cooked.

Serve over rice and enjoy.


*I felt this made the perfect amount of sauce, however you can make extra if needed - Add all the sauce ingredients to a saucepan and simmer until thick.

Friday, February 24, 2012

Carrot Cake Pancakes

I highly recommend making these - and soon!  I love carrot cake and I love pancakes.  It's only natural that I married the two, they had a baby and that baby was a big, steaming pile of carrot cake pancakes!  That's not creepy sounding, is it?


I really don't have much to say about these other than they are really, really good.  They're not too sweet and because I used whole wheat pastry flour in place of whole wheat flour, these were light and fluffy.  They have to be good for your, right?  The pancakes have carrots, pineapple and whole wheat pastry flour.  That automatically makes them healthy!  :)

Because of the sweetness from the carrots and the pineapple, I used less sugar than I usually do in pancake recipes.  I also found I didn't need much syrup either.  In fact, I ate one plain while I cooked the rest of the pancakes and drizzled just a small amount of syrup on the other two I had.  Again, I recommend making these soon!

Carrot Cake Pancakes
Serves: 5 (3 pancakes per serving)

2 cups whole wheat pastry flour
2 medium carrots, peeled and grated (about 1 cup)
1 1/2 cups buttermilk
1/4 cup pineapple, finely diced (I used fresh but you can use canned - just make sure it's well drained)
1/4 cup unsweetened coconut (if you use sweetened, reduce amount of sugar)
1/4 cup loosely packed brown sugar
1 egg
Scant 1/4 cup ricotta cheese
1/4 tsp cinnamon
1 1/2 tsp baking powder
3/4 tsp baking soda
3/4 tsp salt
Nonstick spray


Preheat skillet on medium.  Place carrots on paper towel to absorb any extra moisture.

Add ricotta, egg and sugar to a bowl and combine.  Stir in the carrots, pineapple and coconut.  Add the flour, cinnamon, powder, soda, salt and buttermilk.  Stir until just combined.  Don't over mix or you'll risk the pancakes being too tough.

Once the skillet is heated*, spray with nonstick spray.  Using a 1/4 cup measure, pour batter onto the skillet.  Cook for a few minutes until small bubbles appear.  Flip and cook another minute or two - Until the pancake springs back when you gently press on it.  Repeat until the batter is gone.  I got 15 pancakes from this recipe.

These would be great served with some maple cream cheese sauce (thin out some softened cream cheese with some milk and maple syrup).  But, as I previously said, these are great on their own or with a drizzle of maple syrup.  I bet these would be great with a schmear of peanut butter too!

* Tip to check if skillet is heated - Splash a small amount of water on the skillet.  The water should dance around.  If it does, it's ready for pancakes.  If not, heat a bit longer.

Tuesday, February 21, 2012

Grapefruit Margaritas

I have a slight obsession with grapefruit these days.  I buy some every time I go to the grocery store...  Whether or not I need any!  So, with an abundance of grapefruit and a mouth full of canker sores, I decided I'd make a refreshing grapefruit margarita!

I'm not a big fan of margarita mixes - I always find they're too sweet and that green color just doesn't seem natural!  Don't get me wrong.  I always have a bottle of it on hand in the fridge in case I run out of citrus, or more likely am just too lazy to make a margarita from scratch.  This margarita was nice and refreshing with the right amount of sweet and tart.


Sweet and tart reminds me of one of my favorite candies - Sweet Tarts.  I could eat those like they were going out of style!  I loved how tart they were and didn't mind that my eyes would water constantly while eating them.  What I loved more was tricking my grandmother.  Mean, I know!  :)  Grammie did not like tart food at all, but she would take a candy from us each time we offered her one.  We'd convince her it was sweet and that she should try it.  With one lick of the candy, Grammie's face would squish up and she would spit out any tart flavor in her mouth.  It made us kids (and sometimes when we were adults...) crack up every time.  I like to think she did it on purpose to make us laugh!  Isn't it nice when family gets along?

Anywho...  Back to the margarita!  Grapefruit is a nice departure from the classic margarita and I recommend you make this whenever you're thirsty after a hard day or just would like to unwind with love in a glass.

Note: If you have extra juice, you can easily freeze it in an ice cube tray and use in your next margarita.


Grapefruit Margarita
Serves: 1

Juice from 1/2 ruby red grapefruit (I used a softball sized grapefruit)
Juice from 1 lime
Juice from 1/2 lemon
1 T. agave syrup (more or less according to taste)
Tequila (I used about 2 1/2 shots but this is also according to taste
Ice

This can be made in a shaker or add ingredients directly to the glass and stir.  I prefer to make it in a shaker as it is easier to taste and add ingredients as needed.

Add ice to a shaker.  Add citrus juices, agave and tequila.  Shake until well combined.  Serve over ice and enjoy.


Sunday, February 19, 2012

Strawberry and Greek Yogurt Stuffed French Toast

As much as I love pancakes, I love me some French toast!  I try to make my pancakes and French toast healthier without sacrificing flavor.  I think I struck the perfect balance with my strawberry and Greek yogurt stuffed French toast!

I came up with the idea when I looked in my fridge and found slim pickin's some strawberries, 1/2 a lemon and an almost empty container of plain Greek yogurt.  I  had some whole grain Ezekiel (my favorite!) bread in the freezer so I took out four slices and let it defrost while I made the filling.  The filling was made of plain Greek yogurt, agave, lemon zest and lemon juice.  It was very fresh tasting and the sweet strawberries were a great balance to the tartness of the lemon.

The French toast came together really quickly and because I used a hearty bread, I feel it stayed together really well after soaking in the egg mixture.  This is a dish that could be made ahead and reheated.  The recipe can easily be multiplied which makes this a great option for brunch.  I used strawberries, but any fruit can be used.  I think bananas or raspberries would be delicious options.  I enjoyed my French toast with a drizzle of maple syrup but the filling really adds a yummy creaminess that wouldn't make me miss the syrup next time!


Strawberry and Greek Yogurt Stuffed French Toast
Serves: 1 very hungry person!

4 slices of bread
1 whole large egg + 1 egg white
2 T. milk
Dash of cinnamon
1/3 cup plain Greek yogurt (or flavored, if you prefer.  I used Fage 2%)
1 T. agave syrup
Zest and juice from 1/2 a lemon
6-8 strawberries, sliced
Nonstick spray

Comine egg, egg white, milk and cinnamon in a dish large enough to fit the bread for soaking.  Set aside.  In a separate bowl, combine yogurt, agave, zest and juice.  All of the juice may not be needed so add a bit at first just to thin out the yogurt.  Some yogurts are thinner than others, so add enough juice until the mixture is thicker than salad dressing but thinner than mayo.

On two slices of bread, add strawberries in a single layer.  Top with half of the yogurt mixture and top with more berries.  Top with the rest of the bread forming a sandwich.  Preheat a skillet over medium heat and spray with nonstick spray.  Carefully add the sandwiches to the egg mixture and let sit for a couple of minutes.  Once the bread has absorbed some of the egg mixture, flip over and do the same on the other side.  You should let the bread absorb just enough of the egg mixture but not get soggy.

Once the skillet is warm, add the French toast.  Cook on medium until the bread is crisp, about four minutes.  Carefully flip the French toast and cook a few more minutes.  You want to be careful not to have the heat too high otherwise the outside will cook and the center won't be warmed through.  If this is the case, you can always put the French toast in the oven for a few minutes to heat the center.  Just make sure your skillet is ovenproof!

Enjoy!

Saturday, February 11, 2012

Happy National Pancake Month!

When I found out February is National Pancake Month I got really excited - Maybe a little too excited!  But I don't care.  I LOVE PANCAKES!  :)


To celebrate, I hope to either try a new pancake recipe each weekend for the next month or create new recipes.  When I thought of recipes I'd like to try, I immediately thought of the whole wheat chocolate chip sweet potato pancakes I saw on Eat, Live, Run.  I mean, they're super healthy because they have whole wheat flour, dark chocolate and sweet potatoes, right?  Well, maybe not super healthy, but definitely healthier than pancakes made with all white flour and oil.  These pancakes have the perfect amount of sweetness too.  They only have 1T of brown sugar and a ton of chocolate chips so they're just sweet enough.

I would definitely make these again and if you wanted to make them even healthier you could use all whole wheat (pastry) flour.  I can't wait until next week to try a new recipe - I'm thinking carrot cake pancakes?

Whole Wheat Chocolate Chip Sweet Potato Pancakes


1/2 large sweet potato, baked then mashed with a fork (I used just shy of 3/4 of a cup of canned pumpkin puree and increased the flour by 2T to account for this)

1/2 cup white flour
1/2 cup + 2T whole wheat flour
2 tsp baking powder
1/2 tsp salt
1 tbsp brown sugar
1 cup milk
1 egg, slightly beaten
1/2 cup (heaping) dark chocolate chips
Butter (or nonstick spray) to grease skillet
Maple syrup for serving
Grease a large skillet with butter and head over medium high heat (I used nonstick spray).
Combine all ingredients, mixing JUST UNTIL COMBINED and drop by quarter cups onto hot skillet. Cook for about two minutes each side then serve with warm maple syrup.