Sunday, September 9, 2012

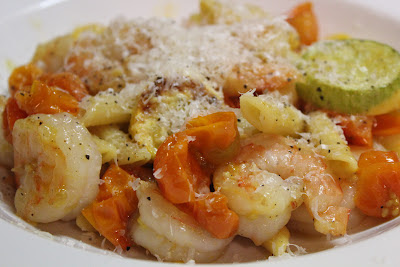
Summer Shrimp Scampi

I guess I'm trying to hold onto summer and it's wonderful produce for as long as I can.  We have less than two weeks left of "official" summer (seriously, where did the summer go?) and I wanted to be able to enjoy my summer veggies while they lasted.

This past week, I visited a local farm stand and picked up some local summer squash and a pint of adorable little orange cherry tomatoes.  I decided to roast the squash and tomatoes and add them to my standard shrimp scampi recipe.  It was a great way to amp up the nutritional value of just shrimp and pasta - Plus, it's a delicious way to use up some summer veggies you may have sitting around waiting to be eaten.


This recipe is pretty versatile when it comes to what kinds of vegetables you can use.  I happened to have summer squash and tomatoes on hand, but any veggies you like would work - I wanted to add the corn from a leftover ear I had in the fridge, but totally forgot until I sat down to eat!  Another ingredient I forgot?  Lemon!  I usually squeeze a bit of fresh lemon juice over the shrimp when cooking, but I forgot to pick one up at the grocery store tonight.  The scampi was still delicious - even without the lemon!

This meal came together in about 30 minutes which makes this a great option for a weeknight meal.  I did use a shortcut when preparing the scampi tonight.  I used precooked pasta which really cut down the prep time.  This dish really is a great way to enjoy what's left of summer's flavors!  I hope you make it soon.

Summer Shrimp Scampi
Serves 2-3

1 pound raw shrimp, peeled
2 medium summer squash, sliced
1 pint cherry tomatoes
Olive oil
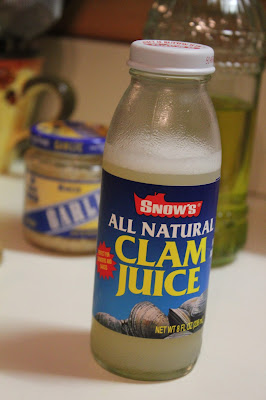
Clam juice
Garlic, about 1 clove finely diced
Salt and pepper
Cooked pasta (about half a pound)
Parmesan cheese

Preheat oven to 425.  Prepare pasta as directed on box.  Line a baking sheet with foil.  Add squash to the pan and drizzle with olive oil.  Add salt and pepper, and toss to coat.  Roast the squash for 15-18 minutes.  After 15-18 minutes, remove squash from the oven, toss so that both sides brown.  Add in the tomatoes, return baking sheet to the oven and continue to roast for another 15 minutes, until the tomatoes begin to burst and the squash is fork tender.


While the tomatoes and squash are cooking, add olive oil to a pan and preheat.  While pan is warming, salt and pepper the shrimp.  Once you see ripples in the oil, add the shrimp and cook a few minutes.  Turn the shrimp, add in garlic, a drizzle of olive oil and a splash of clam juice.  Cook two more minutes (or until the shrimp is just pink) and add pasta.  Toss to coat pasta with the oil and clam juice and turn off heat.  Squeeze half a lemon over the shrimp and pasta and give it a stir.

Once you've plated the shrimp and pasta, top with a bit of Parmesan cheese (freshly grated is great!).


Enjoy!

Monday, August 13, 2012

Happy National Peach Month!


Yes, yes I know.  We're already halfway through August and I'm just NOW getting around to celebrating National Peach month.  I think this may be my favorite month because peaches are one of my favorite fruits.  They're so versatile and can be enjoyed in both sweet and savory forms.

I had originally set out to make this pound cake, but when the time came to bake the cake, I suddenly became very lazy!  One of my favorite ways to enjoy peaches is in the form of a cobbler, so I Googled some cobbler recipes and came across one from Paula Deen.  I stopped my search right there - I mean, it's Paula Deen and I was looking for a Southern comfort food after all!


This recipe came together really quickly.  I modified the recipe slightly by adding some bourbon (!) and raspberries.  I would definitely make this recipe again and am really looking forward to dessert tonight!  :)


Peach Cobbler (slightly adapted from Paula Deen)

4 cups, peeled sliced peaches (I used about six medium sized peaches)*
1 1/2 - 1 3/4 cups sugar, divided
1/2 cup water
A good glug (1/4 cup) of bourbon (like Jim Beam)
8 tablespoons (1 stick, 1/2 cup) unsalted butter
1 1/2 cups self-rising flour (see here for a substitute)
1 1/2 cups buttermilk or milk
1-2 teaspoons cinnamon
1 teaspoon vanilla
Pinch of sea salt
1 pint raspberries

Directions
Preheat oven to 350 degrees F.
Combine the peaches, 3/4 cup sugar, and water in a saucepan and mix well. Bring to a boil and simmer for 10 minutes. Remove from the heat and add the vanilla, salt, and bourbon.
Put the butter in a 3-quart baking dish and place in oven to melt.
Mix remaining 3/4 - 1 cup sugar, flour, and milk slowly to prevent clumping. Pour mixture over melted butter. Do not stir. Spoon fruit on top, gently pouring in syrup. Sprinkle top with cinnamon.  Bake for 30 to 45 minutes; Batter will rise to top during baking.
To serve, scoop onto a plate and serve with your choice of whipped cream or vanilla ice cream.  Or just face-plant the cobbler...  Once it's cooled, of course!

*Tip on peeling peaches: Boil water (I just use a tea kettle).  While water is boiling, score each peach by making an X on the bottom.  Place the peaches in a bowl and pour the boiling water over them.  Let the peaches sit in the water for a few minutes, until they are cool enough to handle.  You can also fill the bowl with some cold water to help make them cooler to handle.  Peel by starting at the X.  The peel should come off pretty easily.  This is a great trick for tomatoes too!

Here are some other great ideas for peaches:
Peach salsa
Peach BBQ sauce
Peach and gorgonzola pizza (SO good when grilled!)

Friday, April 6, 2012

Lemon Curd


I love lemon.  It's tart yet refreshing and it reminds me of warm spring and summer days...  It may be the fact that they go so well into a homemade margaritas!  I picked up a large bag of lemons the other day at the grocery store.  It was a total impulse buy and I wanted to find ways to use them up before they spoiled.  I happened to check out one of my favorite food blogs and found a recipe for lime curd.  It was a quick and simple recipe and I made a batch right away (of course using lemons in place of limes).

The flavor of this curd is right on.  It reminds me of the lemon filling my mom used to make for her cakes.  I've made this twice and the second time, I added some zest to amp up the flavor.  I just love the flavor of lemon and this recipe is the perfect balance of sweet and tart.  The curd is very versatile - I bet it would be great put into small tart cups and topped with fruit and whipped cream.  I find it is perfect just scooped from the jar and directly into my mouth!  :)  Check back later to see how I end up using the curd.


Lemon Curd
Yield: 1 1/4 cups
Adapted from Annie's Eats

3 large eggs
3/4 cup sugar
Zest from one lemon
1/4 cup freshly squeezed lemon juice (about 1 1/2-2 lemons)*
4 T unsalted butter, at room temperature, cut into pieces


In a non-reactive saucepan, combine the eggs and sugar.  Whisk together until well blended.  Whisk in the key lime juice.  Place the pan over medium-low heat.  Cook, stirring or whisking constantly, until the mixture is warmed through.  Be careful not to heat the mixture too quickly to avoid curdling the eggs.  Whisk in the butter a little bit at a time, stirring in each addition until completely incorporated before adding more.  Continue to cook, scraping the bottom of the pan, until the mixture thickens and a spoon or spatula leaves a path when drawn through it (no higher than 175˚ F on an instant-read thermometer.)  Immediately remove the pan from the heat and pass the mixture through a fine mesh strainer.  Transfer to an airtight container and refrigerate.  (This keeps up to 2 weeks in the refrigerator.)


*This can be made with lemons, limes, oranges...  Any citrus!


Thursday, April 5, 2012

Waffles!

If you've been reading my blog, you'd know that pancakes are my number one favorite breakfast food.  Waffles are a very close second.  I love how they can be so versatile - I use them in place of toast for an egg sandwich, they can be made as a dessert (chocolate!) and can even be made savory (cornmeal chive!).  I just love waffles!


I decided to make waffles last week for a change from the usual pancakes.  I went to my go to site since I know I'd seen a few waffle recipes in the past.  I opted for a simple buttermilk recipe but I know there are a few recipes on that blog that I will be trying soon. The waffles came together pretty quickly (other than the 30 minutes wait time after making the batter).  One of these days I will purchase a better waffle iron, but until then, my $10 Target iron will have to suffice!

The outside of these waffles were crisp while the insides remained tender and airy.  I served these up with fresh strawberries and maple syrup.  I remember when my mom used to make Belgian waffles, she would combine the butter and syrup and warm it on the stovetop.  This way, you could ensure you had butter and syrup in every little nook and cranny of the waffle!  My mouth is watering just thinking about these.  I may have to go whip up a batch now.


 I also found that these froze very well.  I easily reheated them by popping them in the toaster so this is a good recipe to multiply to ensure you have leftovers.

Waffles
Adapted from Annie's Eats


¾ cup all-purpose flour (I used whole wheat pastry flour)
¼ cup cornstarch
½ tsp. baking powder
¼ tsp. baking soda
½ tsp. salt
1½ tsp. sugar
½ cup whole milk (I used skim milk)
½ cup buttermilk
1/3 cup vegetable oil
1 large egg, lightly beaten
¾ tsp. vanilla extract


In a medium mixing bowl, combine the flour, cornstarch, baking powder, baking soda, salt and sugar.  Whisk together to blend.  In another mixing bowl, beat together the whole milk, buttermilk, oil, egg and vanilla.  Add the dry ingredients to the bowl with the wet ingredients and whisk just until incorporated and few lumps remain.  Set aside to rest for 30 minutes.


Preheat a waffle iron.  Fill waffle wells and cook according to the manufacturer’s 
instructions.  Cook until crisp and golden.  Serve immediately.


Enjoy!


Monday, March 26, 2012

The One with the Jam

Anyone else know why I chose this particular episode of Friends for the post's title?  The following is a (big) hint:

Joey: Remember when your mom used to drop you off at the movies with a jar of jam and a spoon?
Rachel: You're so pretty.


You're so pretty - That is one of my favorite quotes from Friends and that is what I thought about while making this jam.  When I came across this recipe, I was very excited because the recipe included three ingredients - Berries, agave and lemon.  It is a super simple recipe and the outcome is delicious.


The original recipe calls for just strawberries.  That's what I used in the first batch, but I ate all of it before I had a chance to take photos for this post.  Whoops!  I had no issues whipping up another batch of the jam, but this time I used strawberries, raspberries and blueberries.  This is why the last picture has a blueberry in it since I never got to shoot the final result!  I threw in the raspberries and blueberries since I had only a handful of each and thought it wouldn't hurt.  I think you could use any combination of berries in this recipe.  Next time I will double the recipe since I am literally eating the second batch by the spoonful and it's going quickly!  I may even make a strawberry mojito version since I have fresh mint on hand.  Yum!


With Easter around the corner, this jam would make a nice hostess gift - Just put the jam in a cute jar and add some pretty ribbon or twine.  I would be completely happy if the Easter Bunny left a jar of this in my basket!


You can find the full recipe here.


Wednesday, March 21, 2012

Homemade Refried Beans


ohmygosh!  I think know these are the best refried beans I've. Ever. Had.  I want to plant my face right into a huge bowl of these beans!  I literally just cleaned my serving bowl with my finger and that's only because the bowl was too small for me to get my face into.  These are just too good not to make!  Upon finishing a bowl of beans, I sent an invite out to my friends for a Cinco de Mayo party.  Doesn't everyone plan a party around a dish of refried beans?  Well, they should!

I decided to make these on a particularly warm March day (75 degrees!).  While the beans simmered away on the stovetop, I had the windows open while dancing around to One Direction.  I'm secretly a tween.  Even with the windows open, the delicious smell of the beans and bacon wafted throughout the house.  Apparently, you could smell them outside as well because my neighbor interrupted my dance session came up to my kitchen window and asked what smelled so good!

The recipe is really simple - Much of the time it takes to make these beans is just waiting for them to cook.  The only real prep time (should you choose to soak the beans beforehand) is very minimal.  This is a great recipe to make while you're cleaning the house or folding laundry since the beans need to simmer for around two hours.  The recipe didn't call for bacon but I decided to add it for a smoky flavor.  Also, next time I make these I think I'll add smoked paprika instead of just regular paprika.  The flavor of these beans is like none I've ever had before.  They addition of brown sugar and onions makes them sweet, yet the red pepper flakes adds a nice spicy kick.

Homemade Refried Beans
Serves: 10

2 1/2 cups dried pinto beans
3 quarts water
2 strips of uncooked bacon, diced
1 onion, chopped
1/2 T. red pepper flakes (more or less to taste)
1/2 T. paprika
2 T. brown sugar
4 T. salt, or as needed


1. If possible, soak pinto beans overnight. This will cut down your cooking time a lot. If not, it’s okay. Instructions are the same as below.
2. Rinse the beans to get off any dirt.
3. Add the beans and bacon to a pot and cover with the water. Make sure there is at least 3-4 inches of water above the beans. Bring to a boil and simmer for for 2 1/2 hours (about 1 1/2 hours for pre-soaked beans).  I kept the pot covered until the beans came to a boil.  Then I half removed the lid so the beans would continue to simmer, but not boil over.

4. Once the beans are cooked, reserve 1 cup of the water, then drain the rest. Set aside.
5. In a skillet, saute the onions, red pepper flakes, paprika, and brown sugar for about 5 minutes. Add this to the pot where the beans are and add the reserved cup of water.

6. Using an immersion blender, lightly blend the beans until they’re the consistency you want. If you don’t have an immersion blender, you can use a pastry blender. It gives a coarser consistency than the immersion blender since it’s harder to get every bean.
7. Season with salt as needed. Keep tasting it occasionally - I added only about 1 1/2 tsp to the entire pot. This is also where you can add more red pepper flakes if desired.

I'm off to eat myself into a refried bean coma for a run.  Make these soon!


Monday, March 19, 2012

Homemade Bailey's Irish Cream

I hope you all enjoyed your St. Patrick's Day.  It was a great, but very busy and fast weekend!  I had two birthday parties to attend - One of which was for my dad.  As soon as I found this recipe for homemade Bailey's Irish Cream, I knew I had to try it.  I thought it would make the perfect gift for my dad since he's a big fan of the liqueur.

The recipe I used happens to be vegan because it calls for coconut milk as opposed to cream.  I enjoyed the end result because it had a nice hint of coconut.  It may be because I used cream of coconut instead of full fat coconut milk, but everyone seemed to enjoy it.  If you do use cream of coconut, please note that once the liqueur has chilled the fat will separate and rise to the top.  I simply strained the liquid into another bowl and it was fine after that.  The liqueur will separate but that is because no emulsifier was added to prevent separation (vegetable oil is added to the real deal to prevent this from happening).  It's not a big deal - Just be sure to shake or whisk the liqueur before using.

Since I gave this to my dad for his birthday, we all made sure to do a celebratory shot (or three) in honor of the birthday boy.  My brother and I opted to toast my dad with some car bombs - Man are they good with homemade Irish cream!  This is a super simple recipe and is delicious on its own or with your morning coffee.  :)  You can find the full recipe here at Oh She Glows.